
In short, I’ve gotten the code to work on my home computer with dissipation from relaxation and dephasing added in. I am now working on getting it to work with univac

-
Recent Posts
Recent Comments
Archives
Categories
Meta
In short, I’ve gotten the code to work on my home computer with dissipation from relaxation and dephasing added in. I am now working on getting it to work with univac
For everyone that’s new to OBrien hall.
To use the printers, you must be connected to quantum net, not airbears. Contact someone in person for the password.ls
Then, simply go to your “add a printer” page (OS dependent, see Ana for details for your specific OS or use google), and then look for “Network printers” while connected to quantum net. It SHOULD show up. If not, ask around for the IP for the printer.
Contact Loren for the computing guidelines. I believe Brendan is the IT guru and has the ability to give you a user account. Note that you must install all needed libraries in your home directory and you do not have sudo access. Allocate time accordingly.
During week 2, I produced pseudocode for the evolution and optimizeEvolution classes (these can be found at my github, though be warned that the code will not work at regular intervals and is pretty uncommented. )
Revised edits based on discussion. I will focus on implementing and testing phi2. Additionally, Rho[]~U[](obviously, in some cases different, but current Rho) and Rho_desired=target=C. Initial Rho is already defined. We will also define a lambda_Rho[j]=Dagger(U[j])*Rho_Desired*U[j] Bold refers to my edits
For week 3, I am working on finalizing the implementation and ensuring that it works and produces the same results on Unitary operators. I’m also reading up on quantum stochastic processes. 😀
Settling into Berkeley properly. Berkeley Bowl is an amazing grocery store, my apartment is nice!
This week I did administrative forms(there is a first aid kit in OBrien on the 3rd floor near the shower if people wanted to know), and started to get used to the code base for the summer. It is un-commented for the most part, but fairly clear. This summer I will be working on quantum computing, specifically expanding a numerical algorithm to density matrices as opposed to simply unitary vector cases. I will compile the code on Friday on my home machine and also upload it to github etc.
1. LaTex, benefits
LaTex is a type setting programing often used in the sciences. However, it can be really confusing to use at first, especially for those used to a what you see is what you get(wysiwyg) program like word. I suggest using word equation editor and wysiwyg programs like Lyx in the months before starting the REU you’re in. It greatly benefits my homework grades when teachers can easily read it. I didn’t really like using LaTex when I first saw it, and found it to be a huge pain since there is a learning curve, but now that I understand it, I prefer it.
1.1. Neatness
LaTex produces very nice neat work. It is much easier to use than scanning in equations, even for the most obscure symbols(the code for LaTex symbols can be found by drawing them at http://detexify.kirelabs.org/classify.html, or more easily via google/your search engine of choice if you know the name of it). It does this relatively quickly, and allows very quick exporting to PDF. You can force images to a specific place using commands like h! for images, unlike in word.
1.2. Portability
The PDF is portable to all computers, and will not change when compiled on different computers, unlike Microsoft’s formats. If working extensively with graphics, you don’t have to worry about them being flipped by a computer. Effectively on all modern(post 1980s) printers, what you see on your screen is also what will be printed, no worries about formatting. You can also use the DVI format for more portability with very obscure Linux distros that don’t use Adobe, if you’re that sort of person.
1.3. Backing up work
LaTex allows you to backup long lines of math equations on your computer, as opposed to handwritten scrawls which can easily be lost. Word tends to crash at odd times, so LaTex is better in that respect.
1.4. Open source
Most LaTex distros are open source, and it was created by Knuth. I won’t go into a whole ramble about why this is good, but it is.
1.5. Many uses
LaTex can be used for anything from powerpoints, to papers, to music scores, to notes, to webpages(with a converter).
1.6. Looks pretty
LaTex just looks prettier than word. You really don’t ever want to see some of my MS word not even equation editor homeworks for physics. My boyfriend cried when he saw them. Seriously. It was bad.
1.7. Disadvantages?
LaTex can be hard to use at first. It is a type setting program, like HTML, and involves typing in “commands”. Anyone who used computers in the 1990s or earlier shouldn’t find it too difficult, but it can be difficult to get used to in a rush. I suggest compiling with every change to avoid major errors. It’s also a huge pain to spell check. There are online spellcheckers like microspell, and plenty of spell checkers on Linux, but not many for Mac, and the online spell checkers tend to mess with comments.
2. Basic commands
Latex is somewhat whitespace sensitive, so be careful with extraneous spaces. It also supports tab completion. I suggest finding a LaTex template(I get many from http://www.latextemplates.com, and if using a mac like all of NERSC are using, opening it in TexWorks. There are many better editors, but it’s already installed on your mac. LaTex declares commands using a \ and then you type your command after it. To get a URL in monopoint font, you do \url{URL}. Please import the package \usepackage{url} beforehand. You do this before the command begin document.
2.1. Subsectioning documents
Documents are defined in groups of sections, subsections and subsubsections. You declare them the same way as URLs, and then add the title inside your curly braces. If you wish to have a listing of all of them, type \tableofcontents where you want the table of contents to be.
2.2. Formatting
For papers, you may need a specific format. I just googled the organization and downloaded their template and used that as a LaTex template, following the instructions in the comments
2.3. Comments
Comments are declared by a %.
2.4. How to add odd characters as text, not commands
You can usually add them directly with their name after a backslash. In the case of reserved characters, you add them by \reservedCharacter, such as with &, %, $, _,[,],{,}, and many others. Sometimes you need to add them in math mode, which is given by $ math mode $ or \[ inline math mode \]. Fractions are added by \frac {num } {dem} where the num is the numerator, the dem is the denominator. Please do this in math mode. \rbrack and \lbrack do square brackets, if you don’t want to use them as part of a command.
2.5. How to add images
You first must declare the package \usepackage[ pdftex]{graphicx} Then, where you want your image, type \begin { figure } [H ], with H if you want it there(requires the floats package), h! if you want it roughly there and t! if you want it at the top of the page. This creates an environment meant to have images. Type \end{ figure} when you want to end your environment. You can also add equations and it will off set them, or use a package for algorithms etc. Finally, to actually add the image, save your image as a PDF in the same folder and type \includegraphics[width=1\columnwidth]{ImageName} where the number next to width is the amount of the page you want it to take up, and column width is your width of the page, which can be set manually or via a variable in your template. You can also create an image folder and set up your document that way. Then, your image should be added on the next compile. You can use \label{fig:Name} to label the image with a name to be cited, which is then called outside the environment with \ref{ fig:Name } which then cites the figure number as opposed to needing to do it manually. You can add a caption with \caption{ Name of Caption}
2.6. How to add equations
Add equations by using math mode, as declared by $ math mode $ or \[ inline math mode\]. You can use this inside the figure setting and then add captions to reference.
2.7. References
References are added in text via the \cite{key} if using BibTex. BibTex use is a bit more complicated than will be described here, but is easily google-able and instructions are available in my other blog posts. I’m still a noob at it though. 🙂
2.8. Convert to HTML
To convert to HTML, I’ve used the python package available at http://lucatrevisan.wordpress.com/latex-to-wordpress/ It isn’t perfect, and I plan on modifying it some day to better fit my needs, but it drastically speeds up time. You can obviously post PDFs online as well.
2.9. How to compile
So you’ve managed to open a template and all that. How do you compile it and get a pretty PDF? Well, I’d click on the green button at the top of the page, and then see if it says pdfLaTex next to it. You should either get output or errors. I suggest compiling every few lines to find errors.
2.10. More info
There are many more tutorials online, and I’m always happy to help someone struggling. I personally find http://www.andy-roberts.net/writing/latex to have many good ones. This is meant as a crash course for a summer intern. I would always suggest leaving more time to typeset something than you expect, use google, and ask friends/coworkers. They’ll be happy you’re using LaTex. Feel free to email me as well, I might not respond super quickly but I will help.
6.1. General notes
This consists of the week of August 3rd to August 10th.
I went hiking at Yosemite park, which was awesome!

However, I got sick and had to stay out of work. The dust there is really intense, not so much on the trails as in the campground. The spring water there is generally safe to drink. Be warned if you have allergies, you might become a little ill. Sutter Health in Berkeley is a great option that accepts insurance, unlike the Tang center.
6.2. Presentation tips
I did a poster presentation on Thursday and my 10 minute presentation on Monday. The Thursday presentation went well, be prepared for a fair bit of Q&A from people. Your average audience will not know what parallel code is, a mistake I assumed in the Monday presentation, and may not have heard of CERN. They are not dumb, but between the REUs, there’s a wide range of courses taken, and many schools do not offer a systems class. I was informed on Thursday by many that they were really confused by my presentation on Monday, which assumed people knew that parallel was faster, and that a higher clockspeed number was better. Also, most people on Monday went substantially over the 10 minute presentation time, and I was asked very few questions in front of everyone, but many in private. I would personally have devoted much more time to review of concepts, the teacher I am, but explaining concepts is important. Also, it would have been helpful to explain the significance, as many thought installing ROOT was as simple as installing a game on your home computer, which led to some interesting Q&A. A summary is included below.
Summary
Be very clear Explain everything, no matter if you knew it going into college. Think of explaining it to your bright friend who’s an English major. An EE student might know what clock speed is, but not a parallel algorithm, and a CS major might not know either going into college. A mechanical engineer might not know either, but might be able to understand a hacky for loop or code basic things. Many people do not know low level coding, but will understand high level concepts like algorithms. It goes without saying that you should not be rude or condescending, as many of them know far more about other concepts than you do.
Allow time for Q&A and encourage it People are scared to ask questions that make them seem dumb. This does not mean they are, it just can be embarrassing to ask what you fear is a silly question in front of your peers. Other groups encouraged participation during the presentation, and I think I will do that in the future.
Participate in other groups Even if other groups are dragging on for 25 minutes, listen and ask questions, no matter how hungry we all are. Lunch time presentations suck for everyone, but those 25 minutes will explain their work very well. The more people who participate in net, the more who are likely to participate with you.
Talk with confidence Many other groups appeared nervous or scared. This makes it seem like you don’t know as much about your work, even when you do. Look at someone you know and are friendly with, in the crowd, and talk to them. Talk out, and no one will notice the difference.
6.3. Conclusion
Berkeley was wonderful, I really enjoyed working for NERSC this summer. The weather is awesome, the food(outside of Ihouse :P) is delicious, the shopping is fun in San Francisco, Pride was an awesome parade, and generally it’s a great place. I suggest Bay Porter to get to the airport in case of BART strikes though. I look forward to hopefully coming back someday. Also, I put most of my code on the following github repository(not including the analysis). https://github.com/stacifractals/NERSC_PROOF I wrote most of it from scratch, but did use websites cited in the comments for more complicated things like running through a ROOT file system.
5.1. General Notes
This week consisted of running the physics analysis, editing the paper and poster, and was July 21 to August 3rd. Code is not posted for this week because it is Jeff’s personal code, email Iwona for access if you’re working on the physics analysis. I’ve set all the directories to 744 for this, root/analysis/proof_ph contains my edits, root/proof_ph contains Jeff’s code, on Hopper. This is generally bad practice for security, but I am following the idea of NERSC as a secure box and would rather future interns be able to read my work. Week 8 will be included later, and consists of the presentations and enjoying Berkeley.
5.2. Analysis
I am working on the physics analysis Jeff gave me. I’ve tried modifying both ntupleProof.c and StageDataSets.C,which should be the only things I needed to modify. I changed the working directory to my location in project and a scratch directory, and I’ve set the sandbox, datasetdir(proof-lite) and the proof serv to the correct locations where the data should occur, and out directory to places on scratch or project, with no success. It does produce empty histograms, and crashes after about 30 minutes with the error of being unable to find the dataset, despite presently going over it in stage dataset. It also produces an error where it says the size is zero in the analysis despite going over the data inside and not thinking it’s zero, ie, the error being that it isn’t incrementing the data. The two classes I’ve edited increment correctly. It is also possible that code that supposedly does not need to be edited(selectors, etc), has hard coded data locations. Jeff is busy and wasn’t able to give me an answer of if it works on his PDSF directory, as it didn’t work on mine and didn’t appear to call the eliza directory where the data is located on PDSF, based on my naive reading of the code. Lisa and I worked together for a while on it, and she’s also a bit confused as to where it declares the data set directory. Be warned that the data(in FullCarverI) is upwards of 120GB, this will transfer between the computers in a matter of minutes though.
5.3. Common errors
Seg faults are most commonly caused by the directories not matching in ntupleProof.C and StageDataSets.C. Syntax errors were easily resolved. Segfaults were also frequently resolved by adding the explicit setting to the sandbox and datasetdir to be the directory you want. Ensure these match. Also, often rerunning resolved the segfault, and removing print statements was likely to either cause or remove them. I suspect there’s an issue with ROOT where it reads comments partially and segfaults, so if you comment out code, try to ensure there are no syntax errors if it is code, but this was usually resolved by just rerunning the code. I also often had errors with emacs not being able to make strings and getting confused by quotation marks. This was resolved by doing selected edits in vim or copying and pasting the lines in emacs. I generally got errors either in the first 2 minutes, or after 20 minutes.
4.1. General notes
This week covers July 8th till July 19th. Thursday there is the GPU meeting. This is a double week as most of the work was done on the paper, and to be frank, writing 10 pages takes time, but does not require much documentation.
4.2. Goals
The goal of these weeks were to write our paper and start a poster draft while we waited for the physics analysis to arrive from Jeff. I also applied to a scholarship to attend Grace Hopper.
4.3. How to write a paper
Writing scientific papers may seem quite challenging to the inexperienced. However, by breaking the paper down into stages, I found it much more manageable than trying to write it all at once. If you are interested in seeing the paper, please contact me. I will be posting it here after it is either accepted or rejected from Cray User Groups(CUG).
Formatting I would suggest finding the formatting needed for the conference or REU program one is involved with as the primary step. As I am going to be submitting the paper to CUG, I looked up their website and looked under tips for authors. https://cug.org/PresentationsPubsGuides contains this information, and then contains links to IEEE templates, which I used. There are other templates which are field specific. I personally chose to use the LaTex format, as it allows far better integration with math and with images than microsoft word, which is very graphics heavy. I am also trying to improve my LaTex skills. Most papers are written in a two column format, with assorted oddities for things like adding images and citations.
Layout I chose to lay my paper out in subsections, within sections. I also used subsubsections to indicate where there were subsections within a section, Hopper and Hopper batch systems, recursively placed within a section called configuration, for example. The sections that I used were the abstract,introduction, parallel computation, PROOF, Components and Configuration, Running Jobs, Benchmarks,Analysis, Results compared, Conclusion, Acknowledgement, and references. Yours will vary depending on your topic, but can generally be regarded as variations on the format of abstract, introduction, background, results, conclusion, acknowledgement, and references. The abstract should be a short summary of your entire paper. I suggest writing it after you have written most of your paper, in order to effectively understand the impact and purpose of your work.
The abstract should be less than 300 words, and accessible to all educated audiences, regardless of field. The introduction included the motivation behind the work, and basic information about the experiment, such as how it was done. It can be viewed as a longer, more technical version of the abstract. Parallel computation was where I put a majority of the background information about parallel computation. I put information regarding Amdahl’s law and Gustavson’s law, along with basic information about how parallel computation is done. This will likely not be included in the final paper, but is useful for an audience of undergraduates, such as those in my REU. PROOF included information about the PROOF system, and about how it works to parallelize code. I also compared PROOF-lite to PROOF.
Components and Configuration included machine specific information, such as how IO runs on Hopper and how the batch systems are configured differently on different machines. Think of this section as explaining to other people within your field what makes your experiment different than prior ones. Running Jobs included step by step instructions in order to replicate my results, though not in as much detail as this documentation. Benchmarks included the results of the benchmarks on each system, with different queues used on PDSF and different sandboxes used on Hopper. It should be noted that I did actually test the differences with sandboxes on PDSF, but did not notice a difference. I included many graphs in this section. The Analysis was similar to benchmarks, but contained information about the physics analysis. Results compared the results between the systems and showed how PROOF improved computation. The conclusion was similar to the abstract, but included more of a focus on results, and suggested which method to use. In our case, PROOF-lite substantially improved IO, and improved the memory to computation ratio for CPU intensive tasks.
Citations, or how I learned to love BibTex In many cases, citations will strengthen your work. In fact, in most papers, citations are essential, because most of the work isn’t common knowledge, and plagiarism is generally regarded as bad in academia… However, adding citations in the proper format, and using LaTex, makes the process non trivial. So, utilities like bibtex are useful. I personally started by using Mendeley with the hope of automatically extracting citations from webpages I used. However, most of the sources I used were not traditional scientific journals, but webpages with computer documentation, of which Mendeley could not help much with. So, I eventually just started adding them on my own. I suggest you let Mendeley create the first bib file, as it will add aux files etc, as opposed to needing to add them by hand. Zotero is another suggested alternative to Mendeley, but as it didn’t work with webpages as well, I didn’t explore it too much. Below, my actual bibTex File is shown, with \\ denoting line breaks that are not in the original file.
@article{Amdahl1967,
address = {New York, New York, USA},
author = {Amdahl, Gene M.},
doi = {10.1145/1465482.1465560},
file = {:Users/amct/Downloads/p483-amdahl.pdf:pdf},
journal = {Proceedings of the April 18-20, 1967, \\
spring joint computer conference on - AFIPS '67 (Spring)},
pages = {483},
publisher = {ACM Press},
title = {{Validity of the single processor\\
 approach to achieving large scale computing capabilities}},
url = {http://portal.acm.org/citation.cfm?doid=1465482.1465560},
year = {1967}
}
@misc{Gustafson1988,
author = {Gustafson, John L},
file = {:Users/amct/Downloads/gustavson.pdf:pdf},
number = {5},
pages = {4--6},
title = {{REEVALUATING AMDAHL’S LAW}},
volume = {31},
year = {1988}
}
@misc{ProofArch,
title = {{Multi-Tier Master-Worker Architecture ROOT}},
url = {http://root.cern.ch/drupal/content/multi-tier-master-worker-architecture}
}
@misc{RootSrc,
title = {{Installing ROOT from Source ROOT}},
url = {http://root.cern.ch/drupal/content/installing-root-source}
}
@misc{Wiki1,
title = {{National Energy Research Scientific Computing Center
\\- Wikipedia, the free encyclopedia}},
url = {http://en.wikipedia.org/wiki/National_Energy
\\
_Research_Scientific_Computing_Center}
}
@misc{Proof,
title = {{More about Proof}},
url = {http://root.cern.ch/drupal/content/more-about-proof}
}
@misc{ProofR,
title = {{Proof}},
url = {http://root.cern.ch/drupal/content/proof}
}
@misc{PDSFqsub,
title = {{Submitting Jobs on PDSF}},
url={http://www.nersc.gov/users/computational-systems
\\
/pdsf/using-the-sge-batch-system/submitting-jobs/}
}
By declaring each case with the correct @type, things like authors will be expected. @misc does not require any special formats, and is particularly useful for websites. However, simply creating a .bib file is not enough to use BibTex. I followed the directions on http://www.csse.monash.edu.au/documents/bibtex/gusta, and found that it was essential to remove aux files by clicking on file/remove aux files on TexWorks when it became complicated. I also found a template that included information about citations, but this is not needed. In order to call a citation within LaTex, you use the\cite{arg} tag, where the arg is the key for your document, or within your Bib file, the first thing after the file declaration, ie, Amdahl1967, etc in the above example.
Running BibTex and getting citations to show up is yet another complicated matter. However, BibTex will automatically put the citations in the correct format for your journal, which is the chief reason to not do it by hand. In order to get the correct citation style, where you want your references to be, add the following LaTex tags \bibliographystyle{IEEEtran} and then \bibliography{MyCollection}where IEEEtran is the formatting to be used, specified in your journal template, and MyCollection is the name of your bib file. Once you have added your additions to your LaTex file, and made sure your bib file is in the same directory as the LaTex file, go to your command line/terminal and go to that directory via the method cd. Then, type latex filename twice, entering between them, bibtex collectionName, latex filename and pdflatex once more. Ignore errors in running LaTex if you are using pdflatex, as I am. Then, when you run your file normally, your citations should show up. In the likely event that they do not show up your first time, repeatedly typing in bibtex collectionName, with the correct name of course, was very effective for me. You must go through this process every time you add a new citation, but it automatically formats the text, which is incredibly useful for me personally. Additionally, in the likely event of spacing errors, \vspace{-10cm} will move up your piece 10 cm, and can be changed to a more appropriate spacing as needed. hspace does the same thing, and allows tabbing with hspace*. I used the default graphics package, but also added the float package to LaTex, before the start of my document via \usepackage{float} command. I then used the [H] tag on many of my images in order to put them exactly where I wanted them to be, like \ beginfigure{FigureName}[H]. Expect to see an instruction set on how to use LaTex soon.
Content Exactly what to write in a paper can be just as confusing as the formatting. I would suggest assuming your readers are highly intelligent, but haven’t had much exposure to material that would not be taught in standard major classes. I also found thinking about how I would explain it to my boss to be helpful. I personally also found writing out the paragraphs for the first time, by hand, to be helpful in ensuring that the wordflow was eloquent and useful. Rewriting and reading the paragraphs out loud was also useful for me. I included as much information about time and memory usage as possible, and focused on explaining the graphs I made. I found it to be rather different than a lab report, as I was not trying to justify my results, but explain them. I was also not trying to show exactly how much I knew about the background, but simply show the relevant information and explain it. For instance, the background that I used would have been obvious to anyone who took a systems class, but showing things like Amdahl’s law is beneficial for other REU students who may not have taken systems yet. The only background that will be extensively included in the paper to submit to CUG will be that regarding the NERSC specific systems, as a peer in the field of HPC may not know that much about other systems they are working on. I also found it beneficial to use a thesaurus, and to get other people to edit it. Iwona was particularly helpful here, but other people were also helpful.
4.4. Poster tips
Posters can be almost as daunting as papers. However, as long as they look elegant then the most important part will be your explanation. In order to make them look “pretty”, I added many pictures. For instance, to show my results, I superimposed images of the different IO benchmarks in ROOT, then added the image to the chart. I also created excel charts of Gustavson’s law to show the expected linear increase, and also added images of Hopper itself. I even created a simple chart in excel to show the comparison between CPU performance and memory usage on PDSF and Hopper, so one could easily see how Hopper is more efficient overall, even if it does the same number of calculations.
How to superimpose graphics in ROOT This confused me for a while. How it is done is by opening ROOT, then creating a TBrowser window, via TBrowser tb .Then, one displays the graph wanted, then one navigates via the side window, without double clicking on a histogram, and single clicks on the second histogram to be displayed. Then, in the dialog below the canvas, type
Prof_DataRead_QR_Evts_TSelEvent_Opt.DrawCopy(“same”), where Prof_DataRead_QR_Evts_TSelEvent_Opt is the name of the histogram. Then, navigate to the edit/refresh display panel, or simply type gStyle->SetOptStat(0); In order to change the image of one of the histograms, so they don’t have the default markers, click on the markers twice, select draw panel, scroll down and change the colors or marker shapes. To set the axis range to something different, useful with variant ones like IO on Hopper vs PDSF, click on the axis, and select range user and put it as what you want. Your initial value will probably be 0.
4.5. GPU notes
I attended a talk on GPU computing. The slides are displayed at https://www.nersc.gov/users/training/nersc-training-events/intro-gpus/. Much of it involved programing in fortran, of which I am blissfully ignorant. However, GPU computing allows massive parallelization of problems that are not IO intensive, and allows drastic improvements for certain types of code. NERSC has a system, Dirac, which is a GPU cluster. If one wants to learn how to use it, and is NERSC affiliated, they can request an account via the Dirac webpage.
How to write GPU code Detailed information is available on the slides, this is simply a brief overview. Additionally, more information can be found on google.
GPU computing mostly uses CUDA C or OpenACC. CUDA C involves modifying the source code heavily, is architecture dependent, and is generally more efficient. CUDA C may not work on your home computer as it is not architecture independent, but it will work on Dirac. OpenACC is similar to OpenMPI in that it only involves a limited amount of modifications to the source code, but is 10-20% less efficient than CUDA C. Similarly, in classical computing, assembly is the best, but a compiler will do a good enough job. There is an “in between” model known as directives, which uses means such as the CUBLAS library in order to become more efficient, while still being clear. CUDA C is different than simply calling a library that uses CUDA C because it involves things like memcopy and requires ensuring the memory used is in the GPU, etc. There are CUDA versions of both Fortran and Python, in addition to C. Python is particularly good for IO intensive tasks, and Fortran is already used in many scientific software. Open ACC is much faster to program than CUDA C, for example, Matthew Colgrove of the Portland Group managed to make a 3D elastic wave simulator port to GPUs in 5 hours, for a 5x improvement, as opposed to the possible 10x improvement with CUDA C over many months, as described at http://www.pgroup.com/lit/articles/insider/v4n1a3.htm OpenACC works differently than CUDA C, as it is most properly termed an accelerator. This means that you know some parts of your code will run best on a CPU, and other parts will run best on a GPU. For example, writing your files after modifying them is probably best done by a CPU, but the actual parallel modification can easily be done by the GPU at a much faster rate. If massive parallelization is your goal, GPU computing is the way of the future. I am not sure how feasible it is for ROOT as it would involve extensive modifications to the source code, but it would make an intriguing project for a future intern.
4.6. How to apply to a scholarship
Applying for academic scholarships is different than applying for high school scholarships. For instance, high school scholarships often will ask extensive questions about your moral character and community service. Academic ones care the most about your research, and usually require letters of recommendation. I asked Iwona to write mine about the research I am presently doing. I applied to the Grace Hopper REU one. It will, if I am selected, provide funding for me to attend Grace Hopper and to present my poster there. Each question ended up being answered in about 3 paragraphs.
Questions asked. I was asked about my problem motivation. In this, I described how ROOT will enable High Energy Nuclear and Particle Physicists to have more resources to use at NERSC. I also described how my work is significant, as ROOT has not previously been run on Hopper.
The next question I was asked was the background and related work. This question confused me for a bit, because I didn’t really use much related work, as there isn’t really that much. I decided to describe multithreading and how knowledge of parallelism would be essential. I also discussed the physics involved in my project. I also briefly described my results, and more of why it was beneficial, to show how my work differs from related work. Additionally, I discussed how Hopper is different than other systems.
Another question I was asked was my approach and uniqueness. This question was easier for me, as it was basically my description of Benchmarking, toned down. I also described some of the errors I encountered, and how they were Hopper specific. I also borrowed extensively from my introduction to my paper to explain how it was done. I described in detail the deviations from the default directions.
The final question I was asked was about my results and the contribution to computer science. Explaining my results was simple and consisted of explaining the improvements that Hopper provided. However, explaining the contribution to computer science was challenging because I didn’t exactly discover RSA here, I did an installation and used benchmarks available online, and am being paid for an REU because of the complicated nature of it and the errors encountered, not the academic significance. So, I consulting with Iwona a lot, and she suggested emphasising the benefits to NERSC and how parallel computation is becoming more common. So,I explained that, and also a lot about how my work contributes to high energy physics as it enables high energy physicists to get their code to run in parallel efficiently and easily. I also discussed how cluster computing is becoming a way of the past, and now large scale centers are becoming ideal once more, due to massive parallelism.
One might wonder what the point of this blog is, and why one might want to install proof on a cluster of super computers as opposed to just using serial code and not parallel! Well, this is an explanation of why.
1. Overview
There are many benefits to using parallel computation. It drastically speeds up one’s work by running it in parallel as opposed to series. On Hopper, the default method is to parallelize the code you run as opposed to running multiple instances of the same job as is done on PDSF, and it will run all your code at once, in parallel groupings as opposed to small chunks. Embarrassingly parallel code is best for this method, code which is easily made parallel and has many parts which can be done at once with minimal IO. A large percentage of particle physics code is embarassingly parallel, for example, creating histograms of a large number of events, and can be made more efficient by the out of the box utility known as PROOF. PROOF is an addition to ROOT, from CERN, which greatly simplifies running ROOT on parallel architectures. It focuses on parallelizing by event, not by more complicated methods.
1.1. Why use parallel?
Parallel processing is particularly important for large scale programs working on large, but similar data and algorithms. The brain itself uses parallel processing in order to allow effective sensory computation, as shown by how we process multiple signals at once; for example, the smell of the ocean with the heat from the sand and the bright scenic view on a vacation, are all noted at once as opposed to sequentially.
More importantly than parallel programs being naturalistic, is that they offer a substantial speedup that can be quantified. There are two formulae in common use, Amdahl’s and Gustavson’s. Gustavson’s law describes work varying with input, so Amdahl’s law is a better estimate of speedup.
Amdahl’s law states that the speedup is proportional to the fraction of the program which can be parallelized. For physics problems, this is often a high percentage. In the case of the formula below, 
Amdahl’s Law
The following picture, from wikipedia shows how Amdahl’s Law greatly improves performance on highly parallelizable systems, such as most high energy particle physics experiments.

1.2. Why use PROOF?
PROOF is much easier to use than writing complex multithreaded code by one’s self. It contains many of the functions that are needed, and avoids issues with multithreading by having one write in a framework as opposed to trying to write the multithreading part and having to worry about making sure all processes are killed. It is also easy to write code to a specific framework, and simplier as code only needs to be written once and clarified what events it should process, as opposed to writing and running specific code for each event.
PROOF is a multi-tier architecture which works by splitting the code into parallel segments to be run at the same time, as shown by this diagram, again from wikipedia.

PROOF drastically improves the speed of the computations run on it. Please note the differences here in the CPU Benchmark test of PROOF from the non parallel PDSF to the parallel Hopper. This is the result on PDSF.

This is the result on HOPPER
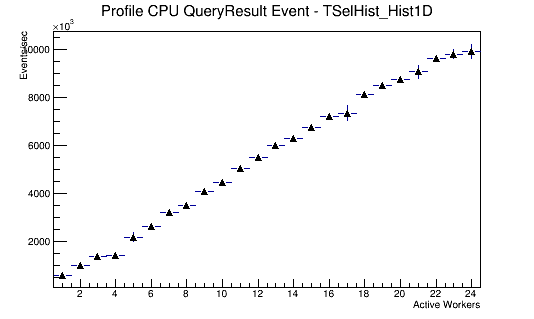
It is clear that PROOF on HOPPER adds efficiency, even though it has fewer active workers at peak, as we only ran it with one node as opposed to many. As opposed to running in serial and thus facing a drop off at a simple 10 workers, as is seen with PDSF, it scales up until about 15 workers. It is also much faster when the events per second are compared Both are much better than running it in interactive mode or from a user log in node.
2. How To?
Although PROOF might seem like yet another complicated tool to use and install, it is actually quite simple to write code according to the PROOF Framework. The PROOF framework is that of the TSelector class, which encourages writing code in the following format: 


This allows one to write code which will automatically be run in parallel, as opposed to traditional and time consuming serial code.
2.1. How to open PROOF
Frequently, PROOF-lite is used on multicore desktops and laptops as opposed to full PROOF. To start a PROOF-lite session,the following commands are used.
$ root -l
root [0] TProof::Open("workers=2")
 +++ Starting PROOF-Lite with 2 workers +++
Opening connections to workers: OK (2 workers)
Setting up worker servers: OK (2 workers)
PROOF set to parallel mode (2 workers)
(class TProof*)0xa85250
root [1]
Please note that the number of workers is an optional parameter for TProof::Open, and is set by default to the number of cores in the processor. When PROOF has been loaded, it becomes simple to run PROOF programs. ROOT contains many tutorials to help one understand how to use PROOF in an effective manner. They are described in detail at They can also be found in the ROOT subfolder root/tutorials/proof and are listed as .c files. The directions on how to open and install a full PROOF session, as is often done on clusters or on older versions of ROOT, is listed at http://root.cern.ch/drupal/content/standard-proof-installation-cluster-machines
2.2. Benchmark
In order to prove that ROOT really does work faster with PROOF, a standardized benchmark is used. The documentation can be found at http://root.cern.ch/drupal/content/proof-benchmark-framework-tproofbench
Proof Bench objects It is very important to create a Proof Bench object prior to working. Generally speaking, a separate one should be used for each benchmark, to avoid errors with memory needing to be cleared, but can be done in one output. It is done as follows.
root [0] TProofBench pb("")
Starting master: opening connection ...
Starting master: OK
Opening connections to workers: OK (24 workers)
Setting up worker servers: OK (24 workers)
PROOF set to parallel mode (24 workers)
Info in : using default output file:

'proofbench-40w-20110208-1217.root'
root [1]
It can be noted that the benchmark class can take the location of your proof cluster as an argument, along with specific outfiles and assorted other options, found at the benchmark webpage.
CPU Benchmark and Dataset The standard CPU Benchmark consists of creating 16 1D histograms filled with 30000*number of workers random numbers. For example, on a 4 core processor, 16 1 D histograms, filled with 120,000 random numbers would be created. This is done by the following code, for default options, but can be modified.
The standard dataset benchmark is done by reading many event files. The default to create, with MakeDataSet is 30000 events. This tests system Input Output(IO) and is very useful for large scale reading of files, as is common in physics. MakeDataSet will make the events for you so you don’t have to have real data. Be warned, that it will by default save the data in your home directory, which can cause issues with quotas on large scale systems. This can be modified with the following addition to your .rootrc file:

//proof.c
void  proof(){
  TProofBench pb("");
pb.RunCPU();
  pb.MakeDataSet();
  pb.RunDataSet();

}
If this macro is run, i.e, via a shell script, it will do the benchmark test and produce a .root file which can be analyzed for the histograms in it. Your results might vary, but there is generally a substantial speedup to using more processors. If you wish to test it directly, set up PROOF with 1 worker and notice the difference between that and many workers. For instance, the following graphs were the result of the CPU test on PDSF and HOPPER computers at NERSC. This is the result on PDSF.

This is the result on HOPPER
Beyond the tutorials, there are many resources for learning about PROOF, and a simple google search will show many examples of ways in which PROOF has been used to speed up particle physics calculations by parallelization.
3. FAQ
3.1. PROOF isn’t opening, what do I do?
First, you should check your library and regular paths to make sure they include the correct path for the root libraries. You should make sure that your LD_LIBRARY_PATH contains, and if it does not, append it so it does, /root/lib and that your regular path contains your ROOT Folder. You can check this with echo $LD_LIBRARY_PATH This should be checked when you install ROOT for the first time.
3.2. I get quota issues doing the data benchmark
Check your quota frequently with the command myquota.
Type du after navigating(via cd ~ ) to your home directory to see where the biggest amounts are. The command du -s *|sort -n might also be useful, as it sorts it into groupings by data amounts. I usually find that clearing one of my .proof directories, particularly the data one with rm -r to suffice to clean out my quota. If you run into the problem often, you can change your .rootrc file so that it saves the data elsewhere. The most proper method is to change the sandbox directory that proof is working from, this is explained in the weekly notes(week3-4)
3.3. Can I do the benchmark in batch mode?
Yes, you can, and it is highly suggested. Simply create a cshell or BASH file that you want to run, call root and the macro, and you should have a working script. It should be noted that the -q flag quits after running and the -b opens without graphics. The following script can be submitted directly on PDSF, but may vary for your computer. On Hopper, a wrapper .pbs script is required for it to run properly.
#!/bin/bash. /global/project/projectdirs/pdsf/amct/pdsf/root/bin/thisroot.sh
root -b -q macros/proof2.c
echo "Root loaded!"
3.4. Why can’t I do CPUx or RunDataSetx
You can’t do these because they run on multiple nodes. If you have access to multiple nodes, it should work, but it increases the number of workers per node, not the number of workers.
3.5. Why is PROOF Lite better than PROOF?
Proof lite is better for many applications as it works right out of the box and doesn’t require any complicated installations. It also showed a small improvment in efficency for the general benchmarks, shown at for plitehp24.cern.ch at CERN. However, PROOF works on all versions of ROOT, no matter how old, so if working with an older version, it may be easier to directly install PROOF than to upgrade.
3.6. Why does it take a long time to run?
You’re iterating over hundreds of thousand of data points. It may take several minutes to do the benchmark due to this. I personally found it took me in the range of 15- 30 minutes to run the benchmark.
3.7. My computer offers me an option to submit jobs with set workers. Why PROOF?
You don’t need to worry about multithreading with PROOF. Simply submit your job with one initial worker, and PROOF will make all the ones you need according to the framework.
3.8. Does PROOF require any additional downloads?
Not with recent versions of ROOT. For PROOF, not PROOF-lite, sometimes xrootd must be installed. With recent versions of PROOF-lite, PROOF is ready to work with as soon as ROOT is installed.
3.9. Where can I find more information?
Try http://root.cern.ch/drupal/content/more-about-proof or the root forums, located at http://root.cern.ch/phpBB3/. The forums have a proof section and the root site contains a lot of useful information about the tutorials and how to set up PROOF, though it is limited on visual examples of what to type and focuses more on general class specific information.
3.1. General notes
These weeks are covering June 24th to July 4th. It covers 2 weeks as Hopper had assorted issues in running the benchmark that were only resolved in week 4. Additionally, due to the holiday and Yelp! trip(part of my REU program), I worked fewer days than normal.
3.2. Goals
The goals this week were to do the PROOF benchmark on HOPPPER, create a script that runs over histograms, producing printed files of them in gif or eps format, and then to research a timer for ROOT as to correctly measure the time needed in “real” time and CPU time. eps is preferred as it can easily be imported into laTex, unlike gif.
3.3. How to do the Proof Benchmark on Hopper
I followed the same procedure in terms of the macros as for PDSF, but many errors were encountered. Please see below.
3.4. Producing images from .root files
In order to simplify the processing of the produced ROOT histograms and variables, I created a macro which would plot all the histograms found within a particular .root file. It is attached below:
#include
#include
#include
using namespace std;
//macro2.c
void  macro4(){

//this is the file you are using
TFile *fileL = new TFile("data/Level2_HESE_nugen_nue_IC86.2011.009250.000xxx_All.root");
fileL->cd();//cd to said file
//create a canvas to print it on
     TCanvas *myCanvas = new TCanvas();
//access the Ttree that we know exists in there, from prior macros
TTree* MyTree;fileL->GetObject("Mreco",MyTree);
  Int_t nevent = MyTree->GetNbranches();//get the branches

	const char * tempName;//temp name of particular leaf
      for (Int_t i=0;iGetListOfBranches()->UncheckedAt(i)->GetName();  //get the name
//print it on the canvas
 myCanvas->cd();
 MyTree->Draw(tempName);
//save it as a certain name
 strcat(tempName,".eps");
 myCanvas->SaveAs(tempName);

  }}
3.5. Timer
There are two classes of timer for ROOT.
TTimer is explained at http://root.cern.ch/root/html/TTimer.html and works on eventloops, or loop of events. It stops events after a certain amount of time, which is useful for measuring walltime and simulating the actual shutoff done with Hopper.
TStopwatch is explained at http://root.cern.ch/root/html/TStopwatch.html and returns the real, and cpu time between start and stop events defined by user. This would be very good to show that PROOF is actually faster, in both real and CPU time, and will be used later on a physics analysis. It is used as shown in the following simple c script.
//proof2.c
void  proof2(){
   TStopwatch t;//create the timer object
   t.Start();//start the timer
//your regular script goes here.
  TProofBench pb("");
  pb.MakeDataSet();
  pb.RunDataSet();
 t.Stop();//stop the timer
   t.Print();//print info
}
3.6. Benchmark results
The following are the results of the benchmark on Hopper
Data IO benchmark

The data benchmark does not scale as expected, this is due to working out of the home directory and will be explained in detail in week 5 and in errors. Effectively, there is an IO bottleneck though.
CPU benchmark results
The CPU scales as expected.
3.7. Errors encountered
There are erorrs with PROOF running and producing data/the IO process on HOPPER, and using the home directory as the working one.
User not found error
In the event you get the following error, when you in fact, exist as an user id: amct: No such user, it is an error with bash on Hopper. I have changed my aprun line to be
aprun - n 1 -N 1 -d 24 -cc none sh /global/project/projectdirs/pdsf/amct/hopper/root/rootShell3.sh
and also tried removing the #PBS -V flag to possible improvement. This did not change anything and was eventually resolved by using the ccm linux and not the reduced version.
Strange results running out of home directory Sometimes, running the benchmarks on Hopper out of the home directory caused odd results. It would produce a data benchmark similar to the one below.
This doesn’t look like the expected scaling and has giant error bars. This is due to running it out of the home directory, which has strict bottlenecks for IO to discourage people from using it as a working directory. Find out where your scratch directories are by typing printenv|grep SCRATCH and consider running from each one to see different results
Error with libraries not found and compilation, path correct In the event of getting the following error after many lines saying various libraries/headers were missing,
g++: /global/u2/a/amct/.proof/packages/ProofBenchCPUSel/TSelHist\_cxx\_ACLiC\_dict.o: No such file or directory Error inACLiC
: Compilation failed!
It is suggested that you make sure that you don’t have multiple files running out of your working directory. Running two instances causes them to overwrite each other and have tons of issues, like this.
Error with finding home directory For the same reason as the user not found directory error, there was an error with finding my home directory. It was resolved by using the following as my .pbs script.
#PBS -q ccm_queue
#PBS -l mppwidth=24
#PBS -l walltime=04:00:00
#PBS -N myscript
#PBS -e myscript.$PBS_JOBID.err
#PBS -o myscript.$PBS_JOBID.out
cd $PBS_O_WORKDIR

export CRAY_ROOTFS=DSL
module load ccm
module load openmpi_ccm

ccmrun mpirun -np 1 /global/project/projectdirs/pdsf/amct/hopper/root/rootShell2.sh
The ccm_queue line refers to the queue to be used, there is a debug queue as on pdsf, but for ccm. CCM is the full linux module, which must be used in order to get functions like id correctly linking to the database. The modules for ccm must be loaded, and instead of using aprun, mpirun must be used, but it is used in a similar manner to aprun, calling your shell script which loads root with the macros. Qsub is still used to submit the script, and it is otherwise similar to the “normal” pbs script in the examples.
The shell script needs to then have the -l flag appended to the #!/bin/bash line at the top, as follows #!/bin/bash -l
This use of ccm may cause minor hits in efficiency, and we are determining if there is any way to resolve that without modifying the root source code. Specifically, the issue is that it takes up to an hour to load ccm, which seems excessive, but may be acceptable for longer running jobs.
We had additionally had attempted to fix it by appending our bashrc.ext to have umask 0027 added at the end. This did not seem to fix anything. It would change the default file permissions, for our bash files.
RSA errors You may encounter the following error when running ccm for the first time, if over quota in your home directory. You may, upon occasion, need to regenerate RSA keys as well.
Incomplete rsa keys - CCM might not function properly with some protocols. Please correct by running ssh-keygen
This was resolved by running ssh-keygen, but should be resolved properly by making sure your working directory is in the correct location, ie, not your home as to avoid going over quota. This is resolved by changing the PROOF sandbox, as shown in the following c++ macro.
#include
using namespace std;
//proof.c
void  proof(){
//the following line changes the sandbox location.
  gEnv->SetValue("ProofLite.Sandbox", "/location/of/sandbox");
//your other code is put below it.
   TProofBench pb("");
   pb.MakeDataSet();
   pb.RunDataSet();
}
It should be noted that it is essential to change the location of the sandbox before starting proof.
Permission denied in cshell If you use cshell, the proper syntax for running a .csh file is not . thefile.csh, but ./thefile.csh even if in the same directory, etc. This differs from bash where the syntax generally is . bin/thisroot.sh in order to run your file to get ROOT working, for example.
Path errors It is strongly suggested to make sure your library path is correct, and that you have run . bin/thisroot.sh before starting root. For better coding practice, it could be added to your .sh script that you submit. This is the library path I use on Hopper.
export LD\_LIBRARY\_PATH=/global/project/projectdirs/pdsf/amct/hopper/root/lib/ :/common/nsg/sge/ge-8.1.2/lib/lx-amd64:/common/usg/lib/
Out of time errors It should be noted that there were many times when 2 hours was not long enough to run the benchmark. It may take longer to queue for a 6 hour long script, but it was the amount of time I found to suffice for all of the benchmarks to run. It takes longer on Hopper than on pdsf. I found that when using the scratch areas, even 6 hours was not enough.
3.6. Benchmark results
The following are the initial results of the benchmark on Hopper

The unexpected bumps are due to running the IO benchmark out of the home directory. Using a different directory had different results, as will be described later. The CPU scales nicely, regardless.

3.8. Hopper differences in output
Hopper had the most differences depending on the directory used for the sandbox, the differences were most pronounced for IO.
Hopper Home Directory Running jobs out of the home directory is highly discouraged. There is a strict bottleneck of 100MB/sec and a quota of 50GB. This is easily exceeded, but ROOT will attempt to use it by default, so it is important to be noted.
SCRATCH and SCRATCH 2 Scratch directories still have a bottleneck, that prevents IO of greater than 35GB/sec, but are encouraged for IO intensive jobs. The default quota is 5TB, which is unlikely to be exceeded in a reasonable run, but if it is, there is the global scratch option, and the quota can be increased upon request. Files left on the Scratch directories are purged after 12 weeks. The location of the scratch directories varies per user, but can be found via the variable $SCRATCH and $SCRATCH2. The CPU Benchmark is shown first, followed by the IO Benchmark. It shows an expected linear increase.


Global Scratch Global scratch includes reduced IO speeds of 15GB/sec, compared to user Scratch, but has a default quota of 20TB and allows users to run code on multiple platforms.
The IO Benchmark shows the largest differences and is shown below
.
3.8. Hopper differences in output
Hopper had the most differences depending on the directory used for the sandbox, the differences were most pronounced for IO.
Hopper Home Directory Running jobs out of the home directory is highly discouraged. There is a strict bottleneck of 100MB/sec and a quota of 50GB. This is easily exceeded, but ROOT will attempt to use it by default, so it is important to be noted.
SCRATCH and SCRATCH 2 Scratch directories still have a bottleneck, that prevents IO of greater than 35GB/sec, but are encouraged for IO intensive jobs. The default quota is 5TB, which is unlikely to be exceeded in a reasonable run, but if it is, there is the global scratch option, and the quota can be increased upon request. Files left on the Scratch directories are purged after 12 weeks. The location of the scratch directories varies per user, but can be found via the variable $SCRATCH and $SCRATCH2.
Global ScratchGlobal scratch includes reduced IO speeds of 15GB/sec, compared to user Scratch, but has a default quota of 20TB and allows users to run code on multiple platforms.
The deviations from linear are because of collisions with other threads on the GSCRATCH directory. There is a limited wirespeed and IO output, which must be shared between all users.
Hopper Project Directories.Hopper Project directories work the same way as PDSF project directories and are stored on the same global file system, thus enabling cross system and user jobs. IO is negatively impacted, as shown below.
Hopper Project Directories.Hopper Project directories work the same way as PDSF project directories and are stored on the same global file system, thus enabling cross system and user jobs.

3.7. Differences for PDSF output
PDSF has the most differences depending not on the sandbox directory, but on the queue used.These are described below. Images are contained within the final paper.
Regular Queue: On the regular PDSF queue, nodes are shared between users. This can cause overlapping and a small delay when multiple users are using the same node. The non Mendel nodes have 16 real cores, which with hyperthreading, results in 32 virtual cores. Mendel Nodes resulted in different results, which are presently being explored.
Debug Queue The debug queue sends jobs to the debug nodes, which have 8 cores for the exclusive use of a single job.
Drained Node Although draining a node is not usually done in a production job, it is an effective way to test a benchmark. It preserves exclusive access to one of the standard nodes, such as those in the regular queue, with 32 virtual cores. It provides an accurate scaleup of the debug queue results
How to get PDSF to output memory. Because PDSF does not automatically output the memory used, I used the command free, with flags -l and -g to output the amounts used in the shell script that was submitted. This allows one to determine, in GB, the amount of memory used.
